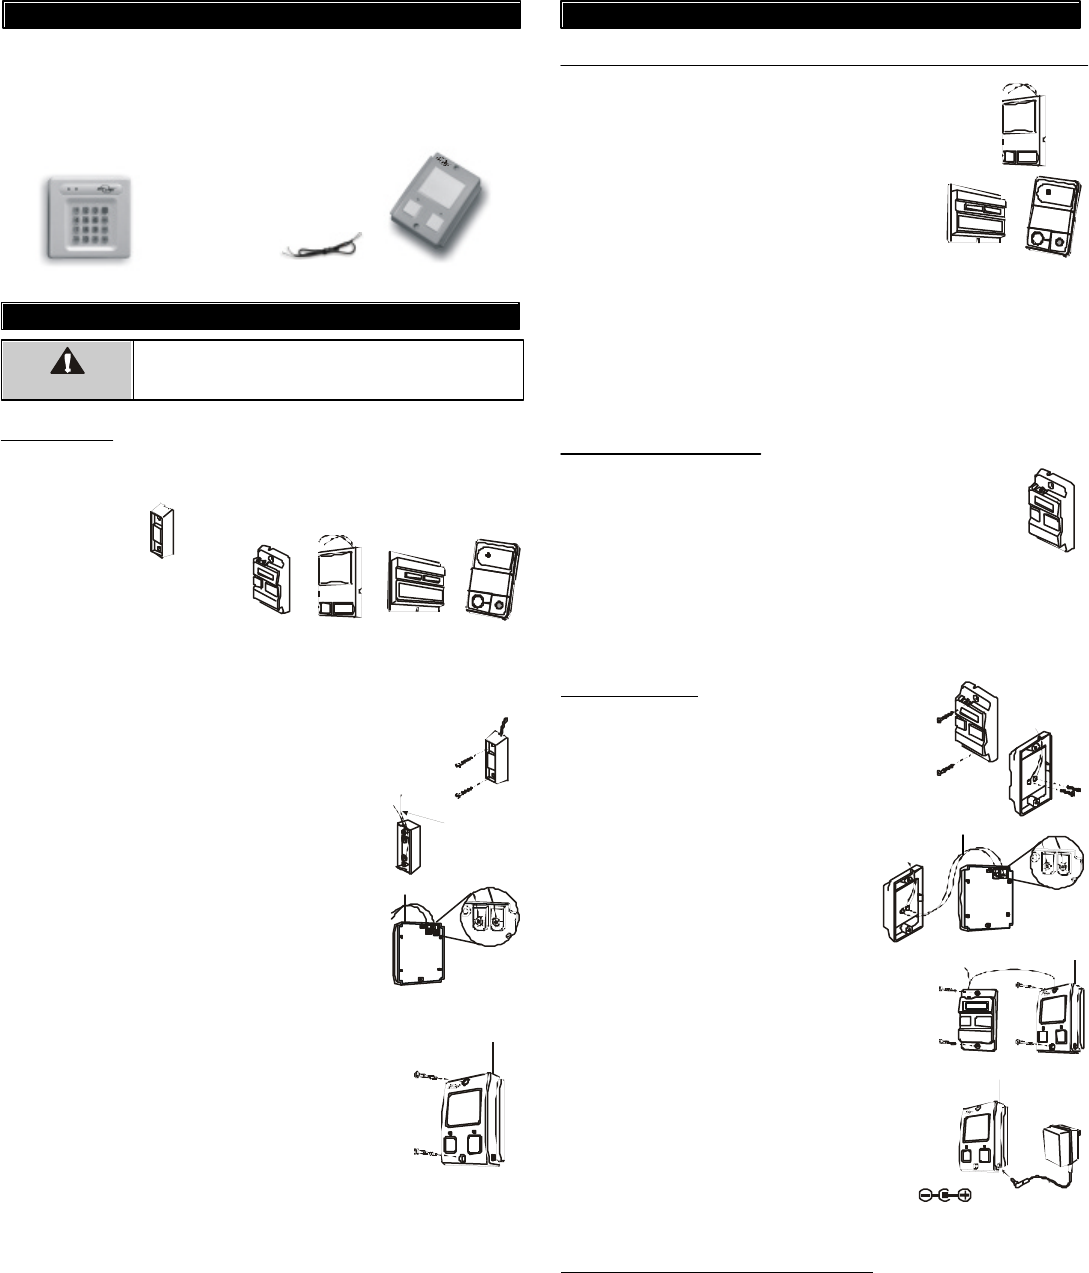
Extension wires
Keypad Transmitter
(Batteries included)
Garage One
TM
GT-100R
1. INTRODUCTION
Model GT-115Keyless Entry System
Congratulations on your purchase of the Skylink
®
Garage One
TM
, Keyless
Entry System. This is a keypad transmitter receiver kit where the
receiver simply replaces your existing garage door opener’s push button
or wall console. Installation is very simple, follow the instructions below
to install the Garage One
TM
receiver GT-100R. This kit comes with the
following items:
2. INSTALLATION
Unplug the power cord of your garage door opener
before installation to ensure power is not connected.
WARNING
Garage One
TM
The GT-100R Garage One
TM
replaces most garage door “push buttons”
or “wall consoles”. There are 2 different kinds of “push buttons”.
1) Single button
2) Multi-Function Wall Console
1) Single button
If your garage door opener equips with a single button “push button”,
you can replace the existing push button with Skylink
®
Garage One
TM
GT-100R. Please follow the procedures below.
1. Remove the existing push button by removing
the screws.
2. Disconnect the 2 wires that are connected to
the existing push button.
3. Connect these 2 wires to the 2 terminals on the
Garage One
TM
GT-100R. Loosen the 2 screws
on the terminals, feed the 2 wires to the 2
terminals and tighten 2 screws to secure the
2 wires.
4. After connecting the 2 wires, the red LED under-
neath the push button will be on. The GT-100R
is now charging up. The GT-100R will be fully
charged when the buzzer emits a beep (approx
10 seconds to 1 minute depending on the brand
of garage door opener), the red LED will then
flash slowly. The GT-100R is now ready to operate.
5. Mount the Garage One
TM
to the wall with 2 screws.
6. Straighten up the antenna on the GT-100R.
Remove
existing
wires
Mu lti-Function Wall Console for Chamberlain
®
, Lift-Master
®
, Sears Craftsman
®
Skylink
®
GT-100R Garage One
TM
also has 3 buttons. It can
replace Chamberlain
®
, Lift-Master
®
, and Sears Craftsman
®
Multi-Function Wall Console directly. That means if you
have any one of these wall consoles, you can simply
remove the existing wall console and replace it with a
Skylink
®
GT-100R. To replace a multi-function wall
console mentioned above, follow the same proce-
dure as to replace a “Single button” wall console.
If your Chamberlain
®
, LiftMaster
®
and Sears Craftsman
®
Multi-Function Wall Console has more than 2 wires, the Skylink
®
GT-100R
should be installed in parallel with the original Multi-Function Wall Console.
Connect the 2 wires from the GT-100R to the 2 terminals marked “RED”
and “WHT” on your existing Multi-Function Wall Console. Polarity DOES
NOT matter. Note: Do not remove the existing wires from your Multi-
Function Wall Console.
2. INSTALLATION (CONT)
Genie
®
Deluxe Wall Console
For the Genie
®
Deluxe Wall Console, depending on whether
the “lock” feature will be used.
- If the “lock” feature will not be used, you can simply replace
the Genie
®
Deluxe Wall Console with a Skylink
®
GT-100R.
To replace a multi-function wall console, follow the same
procedure as to replace a “Single button” wall console.
- If the “lock” feature will be used, you need to connect the Skylink
®
GT-100R
in parallel with the Genie
®
Deluxe Wall Console and an additional trans-
former (sold separately) is needed. Follow the instructions below:
Parallel Connection
1. Remove the existing push button by removing
the screws.
2. Remove the 2 screws that secure the wires
on the Genie
®
wall console.
3. Connect one end of the extension wires provided
in this kit to the 2 terminals on the Genie
®
wall
console, the other end to the 2 terminals
on the GT-100R wall console.
Polarity DOES NOT matter.
Note: Do not remove the existing wires
from the Genie
®
wall console.
4. After connecting the 2 wires, the red LED under-
neath the push button will be on. The GT-100R
is now charging up. The GT-100R will be fully
charged when the buzzer emits a beep (approx
10 seconds to 1 minute depending on the brand
of garage door opener), the red LED will then
flash slowly. The GT-100R is now ready to operate.
5. Mount both w all consoles to the wall with screws.
6. Straighten up the antenna on the GT-100R.
7. Plug in the transformer (sold separately) to Skylink
®
GT-100R. (For Genie
®
Deluxe Wall Console only)
Rating of the transformer: 12V DC, 100mA
Diameter of DC plug : 3.5mm
Multi-Function Wall Console – Other Brands
For brands other than Chamberlain
®
, Lift-Master
®
, Sears Craftsman
®
and
Genie
®
, the Skylink
®
GT-100R should be installed in parallel with the
original Multi-Function Wall Console. Refer to “Parallel Connection” under
Genie
®
Deluxe Wall Console.
Extension
wires
2) Multi-Function Wall Console
Multi-Function Wall Console normally comes with 3 buttons that can be
used to:
1) operate the garage door opener lighting,
2) lock the receiver so it doesn’t accept remote control operation, and
3) push button for door opening / closing
Depending on the brand of garage door opener you have, the installation
is different.
 Manymanuals.com
 Manymanuals.de
 Manymanuals.fr
 Manymanuals.it
 Manymanuals.pl
 Manymanuals.cz
 Manymanuals.es
 Manymanuals-pt.com
Comments to this Manuals